Installation
1) Server Installation:
Preparation: Get the two source file of Scilab and
Scilab Anywhere:
scilab-2.6.src.tar.gz (or higher version, you can
get it from “ftp.inria.fr”)
SciAnywhere.tar
The Server can just be installed on Linux platform.
For installation ,just follow the below steps:
Step 1: Decompress the scilab source code and compile
it. Please study the README for details. In additon,
don’t clean the obj files after installation,
for they will be used by installing Scilab Anywhere
server program.
Step 2:Found a subdirectory, which can be named
"ScilabAnywhere" or other name you like,
under the Scilab Installation directory. Decompress
the file "SciAnywhere.tar" into the new
founded directory. In fact, Scilab Anywhere server
can be installed in any directory. The only thing
in differences is that you must do some changing
in the "Makefile". Please change the value
of the “SCIDIR”, which is "../"
by default, to right path of the Scilab installation.
For example, if your Scilab has been installed in
the directory “/usr/local/bin/scilab-2.6”
while the installation directory of Scilab Anywhere
is “/usr/local/bin/SciAnywhere”, you
should change the sentence in Makefile "SCIDIR=../"
to "SCIDIR=../scilab-2.6" or "SCIDIR=/usr/local/bin/scilab-2.6".
Step3:Copy the file “Makefile.incl”
under the Scilab installation directory to “SciAnywhere/config/”
and replace the former one..
Step 4:Enter the “config” subdirectory
and add executable permission to the file “Init”
by this command:
" chmod u+x Init”
Step 5: After the above four steps, it comes to
compiling the source files. Take it easy ,it is
very simple. Use the shell command “make”
and it will be ok. If there are no errors during
compiling, you will get a executable file “SciServer”.
It is just the file we need only for running Scilab
Anywhere server. Maybe there are some errors during
compiling, look back to the Step 1-4 to check whether
you have done the right operations. In addition,
pay more attention to Step 2.
2)Client Installation:
Client for Linux:
The installation package of Scilab Anywhere client
for Linux includes two file: SciClient.c and SciClient.h.
Installation is very simple. Make sure the two files
are under the same directory. Use the C complier
to compile the files and you will get the executable
file. On the Linux platform, you can use gcc, a
popular C complier for Linux, to compile: “gcc
SciClient.c –o SciClient.” The “SciClient”
is the executable file name. Then you can run the
executable file,“./SciClient”, to start
the client.
Client for Windows:
Run setup.exe and follow the install guide.
3) Server Getting Started and Shutdown
Start Scilab Anywhere server:
1. Enter the directory in which Scilab Anywhere
server has been installed and then use the command
to start the server: “./SciServer [port]”.The
parameter “path” ,which assigns the
port number for the Scilab Anywhere, is optional.
It is suggested that the port number should greater
than 1024 to avoid conflict with the Systerm-assigned
ports. If you don’t set the port number, it
will be 7777 by default.
2. When the server is successfully started, there
should be a message below printed by the server
program:
" Startup execution: loading initial environment
Scilab Server Started!”
3. Once the server has been successfully started,
it will be listened at the assigned port to check
whether there are requests from the clients. If
the server has accepted the request from the client,
it can process the scripts from client and send
the results back to client automatically until the
client exits. A SciServer , by default, can process
at most 1024 client requests synchronously. It is
sure that if you have a server with super ablitity,
the max processing requests can be increased.
Shutdown Scilab Anywhere Server:
Press “CTRL+C” to shutdown the server,
it is simple but effective.
2 minutes’ guide to
Client:
When the Scilab Anywhere server was started you
can use the Client to load on it and run Scilab
on net.
Now we will show you how to use the Client. Ready?
let’s go.
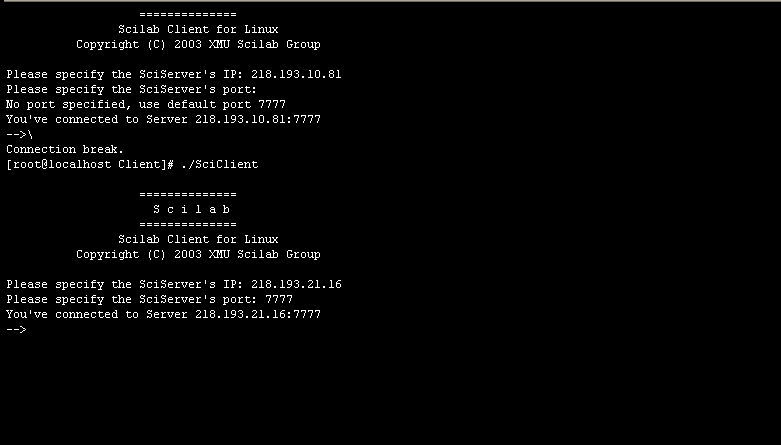
1.Open the Scilab Anywhere Client on you machine.
The window of the Client is like the picture below:

You may be familiar with most of the buttons, don't
you?
Now, let’s use the window of the "Connect
to Scilab Server" to connect to the Scilab
Anywhere Sever.
The port of the port is 7777.
After the Client connects to the Sever, you can
see the window below, where you can input the scripts
of the Scilab and send them to the Sever and display
the result of the Sever.
When the result of the Sever is graphics, the picture
may be sent to your machine, then messages will
show you what to do. While, the text from the Sever
can be saved at any time.
Finally when you don’t want to use the Scilab
Anywhere, you can close the Client directly. Two
messages will be shown at that time, press the buttons,
as you want the computer to do.
Here we also give out
a test host address for the Scilab Anywhere: 210.34.19.197,
and the port is 7777.

